Showing posts with label tutorial. Show all posts

Sunday 1 April 2018

Step by step guide to self publishing with Ingram Spark - Uploading your files

This blog is the second part of a two part blog. If you would like to follow from the beginning, you can read part one here; Preparing your Ingram Spark account

In this blog post, I will go through a step by step process to preparing your files and uploading them to Ingram Spark's website ready to publish and distribute.

Before you can upload your files, you need to make sure that they are formatted correctly. Ingram Spark have strict specifications that you need to abide by, so if you are not familiar with formatting and design, it might be best to hire a professional to ensure you end up with files that will be accepted. If you have hired an illustrator, it's worth asking to see if they offer this as part of the illustration package.

Ingram Spark expects you to upload your book as two files; the exterior as one file, and your full interior as the other. The process is similar, but not identical, depending on what kind of book you are publishing but I am going to assume you are uploading a full colour book with pictures or illustrations and if your book is different you will still be able to follow the process. Let's start with the exterior file.

Exterior file

Your exterior file includes the front of your book, the back of your book and the spine. Depending on your personal preference, you might have a combination of text and illustrations. Your exterior should be one, continuous file that has the front of the book on the right and the back on the left. Here are the specifications that Ingram Spark requires;

- A PDF which is PDF/X-1a:2001 or PDF/X-3:2002 compliant
- CMYK
- At least 300 dpi
- A 100% black only barcode on a white box / background
- A 3mm bleed on all four sides
- A 6mm margin on all four sides

The size of the file is the front cover, plus the back cover, plus the spine. The spine size depends on many factors, such as how many pages it has, what kind of paper you use and what kind of cover you select. You can calculate this through Ingram Spark's spine calculator here; Ingram Spark - Spine calculator

Here is an example of one exterior file I created for a recent project;


Interior file

Here are the specifications that Ingram Spark requires;

- A PDF which is PDF/X-1a:2001 or PDF/X-3:2002 compliant
- Single page PDF only (all double spreads should be split)
- CMYK
- At least 300 dpi
- A 3mm bleed on three outer sides
- A 13mm margin on all four sides

If you have  9" tall by 6" wide book, this is how you work work out the bleed;

The size of the book in mm -  228.6mm x 152.4mm
WIDTH = Add 3mm bleed on the outer trim edge - 228.6mm x 155.4mm
HEIGHT = Add 3mm bleed on both the top and bottom outer trim edges - 234.6mm x 155.4mm

Below is an example of one page from an interior PDF that I created for a recent project. note that you can't tell where the bleed or trim end, as the illustration flows all the way to the end of the paper. The outer edge around the illustration contains little valuable information because that will risk being cut off when the book is manufactured.


Once you have the two files correctly formatted and ready to upload, login in your Ingram Spark account and navigate to your Dashboard by clicking on the tab at the top of the page. From here, click on the title of your book and you should see your metadata and information you have already filled in. Keep clicking on continue (checking the information is correct) until you get to the end, where you will see two sections to upload files; one for your interior and one for your exterior.


Uploading can take some time if you have a large book or high resolution files and I sometimes find the upload times out if you don't have a good enough internet connection. Once the file has finished uploading, you'll see a spinning wheel as the software automatically checks that the file meets their initial requirements. This is not human controlled, so if you receive any errors at all, read them carefully and double check you have calculated the exact size and trim.


Once your files have been accepted, you will be able to submit the book for review by an Ingram Spark employee and your work here is done. As long as you've followed the steps properly and met the requirements, you will have your files accepted and be able to distribute your book. Good luck!

If you found this guide helpful, please share it and let others know!


Step by step guide to self publishing with Ingram Spark - Preparing your account

*Please note, this guide was written in April of 2018. Ingram Spark constantly update their interface so your experience may vary*

New authors might notice there is very little free help when it comes to self publishing with Ingram Spark. The popular print-on-demand publisher is an excellent choice when it comes to ordering high quality print-on-demand books that can be distributed to over 39,000 vendors worldwide, but navigating the strict requests set out by the Amazon owned company leave many hiring a third party to deal with the company on their behalf which can be costly.

In this free guide, I'm going to share with you the steps I've learnt during my ten years of working with clients who choose to publish with Ingram Spark in the hopes that I might be able to make your journey to becoming a best selling author that little bit easier!

As an illustrator who offers this service, I work exclusively with children's books so this guide will involve publishing a children's picture book, but you can apply these steps to almost any kind of literature you would like to publish.

We will go through two main elements; 

preparing your account and uploading your files 

Because I'm going to discuss every step of the way in great detail, I have separated these elements into two sequential blogs for easy reading. This is the first blog.

Before you begin, there are a few things you should have ready.

ISBN numbers

You should have different ISBN numbers for each format of your book. 

For example, the book I am uploading in this guide is Carol Baker's 'A to Z, an Aliterative Anothology of Animals' and we will publish this as a hardback, a paperback and an ebook. Therefore we will need 3 separate ISBN numbers for each version. If you're unsure how to get an ISBN number you can check out our handy little guide here; All you need to know about ISBN numbers. 

Tax information

Depending on what country you live and work in, your tax laws will vary so it's a good idea to read up about what you need to be legal. Regardless of whether your book project is your main source of income or not, you should always be prepared to submit your tax information to avoid breaking the law.

Bank details

This is so Ingram Spark can pay you the royalties earned from your book. If you're trying to sell your book as a main job, you might want to setup a business bank account for these payments.

Now you are ready to start, so let's begin with...


CREATING AN INGRAM SPARK ACCOUNT

Initially, it can be daunting to fill in the information Ingram Spark asks for if you are unfamiliar with the terms they use, but it is relatively straight forward if you take your time.

- Visit www.ingramspark.com 
- Click on 'Create an account' in the top right hand corner
- Fill in your details
- At this point, Ingram Spark will send you an email to verify your email address. Login to your email and click on the link to verify, then visit the Ingram Spark website again to login with your newly verified email and password.
- Accept Ingram Spark's terms of use by clicking on 'I agree'
- Fill in the required information on the next screen.
- Setup a security question
- Read and sign the agreements (note, only two of these are actually required to continue)
- Click on 'finish setting up my account'
- Select a currency and add your bank details (if you wish to get paid through Paypal, you must select US DOLLARS at this screen and Paypal will convert any payments into your local currency)
- Add a bank card

Once you've finished setting up your financial information, you can move onto adding your book. Click on the tab which says; 'Dashboard' and from here, there is a button which says; 'Add a new title', click on this to open up this page.


Now you need to fill in the information about your book. I recommend taking your time to do this properly because once you have filled everything in, it is more confusing to go back and make changes.

You now need to select the format of your book to work on. Is it a physical print or ebook? If you offer both and you will distribute them at the same time, you can choose the combined option.


Then, you can fill in the main information about your book.

Title - The title of your book
Subtitle - The subtitle of your book, leave this blank if you don't have one
Language - The main language your book is written in
Short description - You can use the blurb from the back of your book
Keywords - Research some popular and relevant keywords relating to your book's subject
Series name and number - If your book is not part of a series, you can leave this blank
Edition description - Only fill this in if your book has different editions, different formats (such as paperback or hardback) are not included. Otherwise leave this blank
Full description - This would be an extension of the short description above. You can use a more in-depth discussion of what your book is about, similar to what you might send to a potential agent or publicist. 

Continue to the next step, where you see this screen;


Add any contributors you would like associated with your book, such as illustrators and co-authors then click on continue. Now you will see more boxes to fill in. It is important to fill these in honestly and accurately, because they will form the 'metadata' that is attached to your book. If your metadata is inaccurate it may mean that your target audience cannot find your book.

Imprint - This is defaulted to your business name, which is listed as the publisher data instead of 'Ingram Spark'. At first, your name might not appear because you are a new account, but you can continue as normal and come back to this in a couple of days to select your name.
Subject - Choose the main subject that your book is about, you can select more than one if you need to
Region - If your book includes a real place or country in the world, you can select it here
Thema - This is a global subject that is featured in your book
Audience - Choose the audience your book is targeted towards
Table of contents - If your book has a table of contents, you can write it here
Review Quotes - If your book has been reviewed positively before, you can write quotes from the reviews here


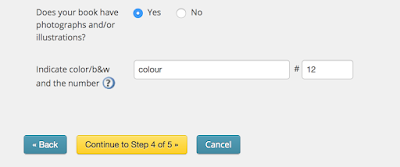
In the options at the bottom, tick yes if your book has illustrations or photographs included, and in the first box fill in either 'b&w' or 'colour' depending on what your illustrations or photos are. If you have a mix of both, write 'colour'. In the smaller box next to it, enter the number of illustrations or photos that are included.


Now we move onto adding more technical details about the format of the book itself. It is very important to know the exact details here, if you have an illustrator or designer handling your book, make sure what you enter here is what they have been using to prepare your files.


Trim size - This is what size your book will be AFTER printing
Interior colour and paper - This is the paper quality that the INSIDE of your book is printed on. Your preferences and budget will determine which one you choose. If you are unsure what the difference is, check out this great post about the options. 
Binding type - This is what the OUTSIDE of your book will look like. If you are unsure what the difference is, check out this great post about the options. 
Trim size - This is what size your book will be AFTER printing
Laminate type - This is what finish the cover of your book will have. If you are unsure what the difference is, check out this great post about the options. 
Page count - This is the number of actual pages (not sides of a page) your book has. All pages are counted so include any blank pages. Since one page has two sides, it should be an even number. 

The next page will include details about the pricing of your book. In the top box, you can enter the ISBN that is associated with this version of your book. There is an option to assign a non-distributable ISBN, but I would not recommend this unless you are making a book that you don't intend to sell or distribute.

In the following boxes, you can enter the retail price of your book for each country. You should have already thought carefully about how much you want your book to be, paying special attention to how much each print will cost and how much you need your profits to be. You'll notice a box called 'Global connect program.' This is Ingram Spark's program that allows publishers anywhere in the world to print and distribute your book. As long as you are happy to sell worldwide, you can tick this box and enter the price.

On this page you can also set rules about returns and wholesale discounts. Take note of the number that appears at the end of each column - this will be your earnings for each sale. If it is red, it is a negative balance and you won't be able to continue.

Publication date - This is the date your book will be published
On sale date - This date is the first date your book can be sold. You can leave this blank and it will automatically be the same as your publication date

At this point, you should see a prompt to start uploading your files, well done! Visit my next blog post to follow the steps to upload your files and continue using Ingram Spark to publish your book.

Next: Preparing and uploading your files


Tuesday 31 January 2017

Illustrating bubbles - Adobe Photoshop Tutorial


Say 'hello' to Norman!

Norman loves swimming, talking to fish and exploring sunken ships, but Norman is currently missing a few bubbles. 

Bubbles are one of those things that seem like they should be really easy to draw but actually are quite difficult. They're moving, reflective, translucent balls of air and trying to draw one without it looking like a white circle is definitely a challenge. Here's my tutorial on how I create a good-looking bubble using Adobe Photoshop! 


Step One - The Outline

Using the tools panel, select the paintbrush tool. I always use a hard round brush and set the size to 3 and the hardness to 100%. Your size might differ if your canvas is a different size to mine, so play around until you can create a line of similar width to mine.

It's worth noting that I draw with a Wacom tablet and keep the Opacity Pressure tool on so that the lighter I press the less of a line appears. 

With white as your colour, draw a circle. Don't worry if it's a bit wobbly as bubbles usually are! 


Step Two - The Centre

With the paintbrush tool again, this time select a soft round brush. Set the size a lot bigger at 95 and the hardness a lot less at 0%

At the top of the Photoshop panel there will be two options; Opacity and Flow. Set the opacity to around 50% but leave the flow at 100%

Now fill in the bubble. The tip here is to fill in about half of the bubble randomly, using two or three strokes. I let my strokes overlap and one of my strokes was more of a 'dot' than an actual stroke but you can play around to create a unique bubble for you.


Step Three - Delete the middle

It seems silly to delete what we just did, but this makes a nice round middle for our bubble and gives it some depth. 

In the tools panel select the Eraser tool and set the brush to a soft round brush the same as we just used but with a bigger size. The size wants to be big enough to delete the middle of your bubble in one click but not too big that it deletes some of the white centre we just made. You should end up with something like this;


Step Four - Add some highlights

Again, select the hard round paintbrush with a hardness of 100. My size is 72 here, a bit bigger than our outline. The Opacity should be around 50% again and the flow stays at 100%.

You might find slightly different settings work better for you, which is fine!


We are now adding some highlights to our bubble. I like to change the highlights on each bubble so they are all different, but usually the top has the most highlight and a few bits elsewhere. I also selected the eraser again and with a smaller size (but the same settings as I used before) I deleted some more bits of the bubble next to my highlights so they stood out a bit more.


Step Five - Add some colour

Using the same settings as we did for the highlights, just change the colour. 

I used pink because Norman is purple and the bubble is reflecting Norman's colour. you should select a colour which is a lighter or more washed-out version of whatever the bubble is in front of or near. 

Make sure you don't fill too much of the bubble with highlight and colours (we still want to see through it!) and don't forget to change the colour depending on the bubble's surroundings.


And there you have it! The more bubbles you create, the faster and easier it will be.

You can copy and paste the bubble and change the size to create lots of little bubbles, or just play around with the process to make oblong and wonky bubbles - feel free to be creative! They really look effective when placed over objects like Norman's body. If you put any bubbles in the background, try turning their Opacity down to make them harder to see. (They will have to be on their own layer to do this.)


I hope you enjoyed the tutorial - have fun making bubbles! Bye Norman!


Tuesday 21 June 2016

Developing a character and listening to feedback.

A live project example, complete with client feedback!


It's not enough to just be able to 'draw' to be successful in the illustration game - you need to hold a myriad of essential skills, two of which are; 


- being able to listen to criticism and, 

- making changes to your work based on that criticism. 


To demonstrate this ability in a real-world setting, I decided to share with you a recent character development project. You can see my sketches, plus the actual client feedback along the way and how it affected my work!


1. The first draft.

The brief was to create a character which will be used in a children's book as the main antagonist. Here's what I was given;

Could the girl be designed with brown hair and a pink dress? 

While this seems quite vague, I have already read the script so I know more about the character from her role in the story. She's a young girl who has a wobbly tooth. Here was my initial sketch based on the description given and my interpretation of the script.


2. The second draft.

 
I really like these examples from your website, would it be possible to combine these three together somehow? Perhaps with longer hair in pigtails? 


2. The third draft.

I like the twin tail look, but could we try the design as a cuter, younger, more rounded design? 


2. The fourth draft.

Great! Much better. Can we add the twin tails back?


2. The fifth draft.

Thankyou for the sketch. I think we're pretty close. Could we make the hair a bit more defined with it being a bit more pronounced and maybe some bobbles or flowers?


I think we've got it! Let's proceed to colour.

As you can see, most characters go through a series of changes before we finally settle on one to move forward with. Here is our character once we added colour, the client loved her!


This cutie will be featured in her very own adventure soon... watch this space!


Thursday 5 November 2015

How To Draw A Cute Christmas Penguin - A Step by Step activity for kids!

How To Draw A Cute Christmas Penguin - Step by Step Guide

A great Christmas themed creative activity for kids!


When I was young, Christmas meant a lot of things; family, school plays and re-runs of The Vicar Of Dibley on the T.V to name a few! But one of the things I looked forward to the most, was sitting down at the family table for hours with a bucket of colouring pencils and a stack of white paper and drawing page after page of Christmas themed pictures. Penguins, reindeer, Santa, Snowmen - you name it, I drew it!

Twenty odd years later, and I'm sitting at my own table with my nephews and nieces doing the very same thing.

This November, I'll be creating four Christmas themed step-by-step guides that you can draw with the children in your family. Try igniting the imagination of children of all ages by helping them draw, and for the younger kids, scroll to the bottom of each guide to download the full picture to print out and colour in!

The first guide is our cute Christmas Penguin! Are you ready?


Step One 

Draw an egg shape with the top cut off

You can use crayons, pens, pencils or even paint!
Draw an egg that is missing the top.


Step Two 

Add a flipper

You can make the flipper point upwards or downwards - do you want him to be waving?


Step Three 

Add another flipper!

Draw another flipper on the other side.
You can make them symmetrical or have this one pointing a different way.


Step Four 

Add a line across the top of the egg

This is going to be his hat


Step Five 

Draw the bottom of the hat

This penguin is wearing a hat like Santa!


Step Six 

Draw a wavy line across the top

Don't worry if your wavy line looks a little different from mine, that's all part of being creative!


Step Seven 

Connect it with a little line

Make sure there are no gaps!


Step Eight 

Add a bobble on the end!

Draw a circle on the end of the hat for your bobble


Step Nine 

Draw a U shape in the middle

Can you guess what this will be?


Step Ten 

Draw a line across the top of your U shape

That's right, it is the penguin's beak!


Step Eleven 

Draw a line either side of the beak

Remember to connect them so there are no gaps.


Step Twelve 

Draw a foot on each side

Try making a W shape for the foot, and connect it to the penguin's body.
You can give him big feet, or little feet - it's up to you!


Step Thirteen 

Add the eyes

Draw two little dots for the penguin's eyes.


Well done! You've just drawn a cute little Christmas penguin. Isn't he great?! 

How about now you try and colour him in?

If you drew a penguin, I' love to see how you did! 
Send a photo of him to izzybean@izzybean.co.uk and I'll upload your work online!

Keep your eye out for our next Christmas Activity - coming next week!


Here is a large version of the penguin, you can download him, print him out and hand him out to kids to colour in! Just right click and 'Save Picture'


Monday 20 April 2015

A Guide to Writing the BEST Blurb for your Book!

So you've written your book, you've got the perfect illustrations to accompany it and your front cover screams 'read me!'... are you ready for your blurb?


What is a 'blurb'?

A blurb is the text on the back of your book which describes what your book is about.   The dictionary says;

blurb

 (blɜːb
n
1. promotional description, as found on the jackets of books


Why is it important?

Think of it as your sales pitch - that one chance to describe your story to potential readers and hook them in. A lot of authors write their blurb as an afterthought - something that sums up the end of their project when really, you should be thinking about this before you've even finished writing your story! Your blurb will be the text on which the rest of your book is judged - rush it or half heartedly write it and the customer may think your story will be the same. 

Every word in your blurb should work towards selling your idea, your story, your characters - and make it the reader want to find out more! Why should they buy it? Why this book? Your blurb should be THE BEST blurb you could possibly write for this book, anything less will not do.

What should it contain?

There are no set rules for what your blurb should and shouldn't contain, but in my many years of working with children's books I've read a lot of them - good and bad. Here's some pointers to get you started.

What kind of book have you written? A kids picture book? A horror novel? Make sure it's clear what kind of book your reader can expect!

What words describe your book and fit well with it's theme? Fast? Passionate? Quirky? Awkward? Sad? These are the words you should try to use. Try to only use powerful words and avoid cluttering up sentences with pointless, long descriptions.

Who is reading your book? If your book is aimed at high school girls, then you probably don't want to talk to them in the same way you would a 54 year old mechanic. Use appropriate language for your target audience.

Keep it SHORT!
I can't stress this one enough - you have a very limited window to sell your book here, someone has picked it up and is actually reading the back of it! Don't bore them or scare them away with an essay. keep it short, sweet, to-the-point and make every word an important, powerful word.


Do...
-Introduce your main character
-Explain the situation and main conflict without revealing the ending
-Keep it short, but powerful
-Write, and re-write until your blurb is perfect
-Use powerful words that reflect the theme of your book
-Write in the present tense
-Use a short extract from your book if it is action filled and catchy
Don't...
-Use lots of words to over describe
-Clutter the blurb with too many characters or events
-Mention other books or authors
-Blow your own trumpet - let the reader be the judge of that!


Your blurb should sound nice. (Sound nice?) Yes! A little bit like a poetic verse, your blurb wants to roll of the tongue, be easy to read and flow like a lover serenading. I've  included below some examples of blurbs from popular, famous books that you have most likely read. Let's see if you can guess which book they are from!*


Harry Potter thinks he is an ordinary boy - until he is 
rescued by a beetle-eyed giant of a man, enrols at Hogwarts School of Witchcraft and Wizardry, learns to play Quidditch and does battle in a deadly duel. The reason: HARRY POTTER IS A WIZARD!


Streetwise George and his big, childlike friend Lennie are drifters, searching for work in the fields and valleys of California. They have nothing except the clothes on their back, and a hope that one day they'll find a place of their own and live the American dream. But dreams come at a price. Gentle giant Lennie doesn't know his own strength, and when they find work at a ranch he gets into trouble with the boss's daughter-in-law. Trouble so bad that even his protector George may not be able to save him...


When Alice follows the White Rabbit down the rabbit-hole, she finds herself in a wonderland of amazing characters where anything can happen. There is a Mad Hatter, a March Hare and a sleepy Dormouse who hold a never-ending tea-party; a Cheshire-cat who appears and disappears at will; a sad Mock Turtle who enjoys dancing with a Gryphon; a Caterpillar who gives invaluable advice on how to shrink and grow and a Queen of Hearts whose constant command is 'Off with their heads!'


Think about your font...

It may not be the first thing you think of, but the font of your blurb is important too. Overall, it must be readable, but you want the font to relate to the book and accompany the theme. Don't settle for Times New Roman because it was the default font - explore and experiment to see what fits best! 

Print out your blurb at the size it will be read. Does it look good? Can you read it? Does it sit on the back cover nicely? Could it be better?

There are plenty of fonts available on the net and a lot of them are free! Just make sure you are allowed to use them for commercial use.

Should I pay someone to write a good blurb for me?

I've seen several publishers offering a relatively cheap service to write a 'professional' blurb. While I can't say I have ever used this service, I can see why it is appealing. Ask yourself - have you tried writing your own before giving up? Has the person writing your blurb actually read your story? Do they have the same connection you have to your characters and the events that shape their lives?

I'd be interested to hear if you did pay for a blurb and the outcome was successful - please get in touch in the comments below!


I hope that helped you write your blurb, or at least got you thinking about what it should contain. Good luck with your book!

In the meantime, if you have a project you need illustrating, you can email me at izzybean@izzybean.co.uk

You can see my online portfolio on my website at www.izzybean.co.uk 

Izzy Bean


*The answers to the famous blurbs...

Harry Potter and the Philosophers Stone
Of Mice and Men
Alice's Adventures in Wonderland

Did you guess correctly? Let us know in the comments!


Friday 25 October 2013

Step by Step HALLOWEEN DRACULA VAMPIRE MONSTER! With Free colouring sheet for kids!

I've been posting these halloween guides all week, and today it's the turn of DRACULA!

All you need is a pen and paper - or a computer and mouse. It's not too difficult and it's easy to personalise if you want to be creative too!

And there's a FREE downloadable colouring sheet for kids at the bottom of this post!

DRAWING DRACULA - STEP BY STEP GUIDE

To start with, make a shape like this;

And another one, exactly opposite. They want to be as near symmetrical as possible, and the same size!

Then, draw this strange shape. This is the most difficult part, I promise!


And as before, draw it's mirror image opposite. All these shapes should connect and create one shape - the face!


Next, add this line and curve as above. Try to end it about 1/5th of the way down from the top, and in the centre of the face.


Do the same on the other side, making sure they meet in the middle!


Now we'll be adding ears. You can draw any shape ears you like, pointy ones work very well for Dracula. It's good to keep them symmetrical.


His nose, again, can be customised to create your own look, but pointy, long and thin are always a winner.


Next, we add the eyebrows. Have them meet in the middle, but not touching - you can leave a little gap. Arch them high in the middle for that menacing, evil effect!


At either side of the nose, draw small curves like this...


... then connect them with a menacing smile!


Add a little curve under that smile to give him a bottom lip!


Next, draw a long line downwards from the chin, and flick it outwards at the end.


Do the same on the other side too


Then, find where the very bottom of the nose is, and starting from the cheek besides it, draw a long curve, stopping at about the same length as his chin.


From this curve, draw another curve (not quite so curvy!) inwards, but stop before you get to his neck!

Apply the same to the other side, and you're nearly there!


Add two little beady eyes underneath those eyebrows you drew earlier. 


Now we can add some details to the inside of the ears... but wait! 
We're forgetting the most important bit!!


The fangs! Draw these nice and big, with sharp points on the end! 
He wouldn't be Dracula without them.


And there you have it! A sinister vampire cartoon of your very own!

Add some colour and share him with the world! Or me... at izzybeanillustrations@gmail.com


And as promised, here is a downloadable colouring in sheet for the kids, little and big! Just right click on this massive image below, 'SAVE AS' then print onto A4 paper.

See you next time!